So- as I said there are countless tuts out there so I am not going to reinvent the wheel- but in case you wandered on in here and would prefer a good starting point....
Let's start with opening QA -
There is your little mannequin all set and ready to go - no pics at this point since you can see it for yourself and I am a tad lazy!
You will note the arms are straight out in the now infamous T-Pose. That first frame is needed by SecondLife and other virtual worlds as a place marker. From that frame comparisons are made to the following changes we shall make to the figure.
Firstly, I want to give u a wee bit of advice. Create a basic starting point to save you the effort later.
On your little mannequin friend move every single body part one degree in any direction that you like. Click on a body part, choose a coordinate (x, y, z) from the sliders to the right of the stage and change one to "1". This prevents the built in anims from over-ridding your careful work and messing up your anim. This will be the first thing you open from now on when creating an animation. Locking your joints makes you work go how YOU planned it to go. Save this with a sensible name such as Basic.
YOUR FIRST POSE!!Let's try something simple - on frame two, lower the arms to the side by clicking on the left shoulder. Now see the sliders to the right? Use the Z coordinate, the blue one, and move the slider left and right watching the direction of the arm as it moves.
Oh! Notice the Menu Bar across the top. See where it says Options? thee are several choices- feel free to play with them and see what they do, but for now I want you click Joint Limits so the check is OFF. Now go back to the slider and move it all over. See what bone breaking things the poor mannequin is subjected to?
This will be important later. For now, let's not get too fancy. Click it back on and lets make a little pose.
So - I have our victim's left shoulder at minus 50 on the Z axis- that sets the left arm pretty much down. Let's do the same with the right shoulder on the z axis. Note on the right side, the setting is POSITIVE - not MINUS 50 but just 50. The Y and Z axis mirror each other, the X is the same.
I am now going to shift the right shoulder to X 30 and Y -17
(OK I give in- pictures)
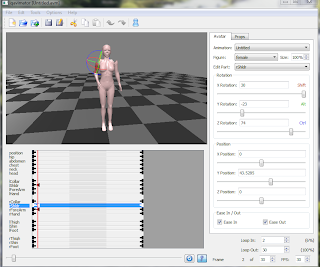
Here we also have the right fore arm at Y 68, the right hand is still at X 1 from my basic pose and Z is set to 2. Let's make the legs less wooden.
Still on Frame 2, click on the Rright Thigh and move it to Z minus 5. Click on Right Shin to X 14, Right Foot is moved to X 19.
I moved the Left Thigh to X 2, Y minus 6. the Left shin is left at X 1 and the Left Foot as well.
Now - copy that frame by clicking Edit Copy from the Menu bar and then click on the last frame and Edit Paste.
You are all done!! You now have completed your first pose - a casual stand.
Let's save it - it could be a jumping off point for later on. File Save As (I recommend having a directory or sud folder or what ever other differentiation to identify your animations or type of animations but that is your choice. Name your anim and enter. The file is automatically saved as a .avm file. Now you need to Export For SecondLife. That creates your .bvh file and the file you will need to import.
Let's import the file. Now frankly, while SecondLife is the best known of the virtual worlds at the moment, there are several out there and I myself make my home on
InWorldz. the advantage to going to an OS world is there are no upload fees but feel free to use the beta grid in SL if it pleases you.
How to UpLoadIn the world, click File, Upload, Animation. Here you want to make sure you click the Loop box. You want your animation to loop in on the second frame - so change the first box to 2 where it says Loop In. The priorities control what can play over what. It depends on the purpose of your pose or animation on what Priority you should choose, but for a free standing pose ball I personally prefer Priority 4 so people do not have to turn off their Animation Overriders (AO's) so that the pose works. Leave the 100 alone. That is all there is to a simple animation upload. You could test it if you wish and see it running in the upload window or just upload and test it in world.
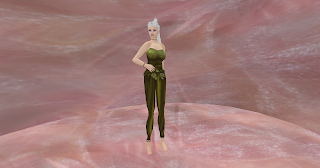
Tada!!! In world pose result. Next time - let's get a little ACTION going!!!


