Pages

Wednesday, December 7, 2011

This Just In!!!

A poster on the SL forums asked about deleting frames from an animation. It had been my experience up to now that it simply could not be done. The poster said she had been able to do it on an older version of QA- so I dl'ed a few of the older ones and could not find anything....

Until- another poster had gave the exact file to DL- it was the 2008 Windows version- still available on  Qavimator, now scroll way down and you will find it. I tested it- it works! Oh the number of hours a simple delete feature saves!!!


 Go Forth And Animate!!

Thursday, November 10, 2011

Assorted Notes - Ease In & Out


Today’s post will be a mishmash of things I have gleaned from reading other much more knowledgeable folks and so I cannot take credit for the following bon mots but I will share them with you. They are paraphrased because I have collected them over time in my head and cannot recall from whom I heard them.
 If you want to have a natural looking walk, remember that Abdomen and Hip must move in opposite directions, arms and legs also move in different directions and should have a slight swing. As I have said before, do the move you want to create a few times for yourself so you can see how your body moves naturally.

Regarding Ease In and Ease Out –

First let me quote the SL Wiki directly:
“Ease In(sec) & Ease Out(sec): This setting allows you to set the amount of time for your avatar to realistically ease (or morph or tween) into an animation from it's current pose, or out from the end of the animation into the next. A setting of 0.000 will cause your avatar to snap instantly into the new pose, instead of smoothly transitioning there. This setting is measured in seconds.”
What this translates to is the smooth and flowing change from one position to the next. Sometimes you want to use and other times no. For example our little Jumping Jack – Ease in and out there would have made it seem as if she was flowing from the ground into the air and back down again, negating the effects of gravity – unrealistic! In other instances, perhaps a dance? The use of Ease in and Out are required- play with the feature and see what works best for you.  You can choose where to use this feature by ticking the appropriate box, or if you know ahead of time you need it mostly or through out your animation, choose Tools, Configure QAvimator from the drop down menu  and tick the Ease boxes. Now QA applies it continuously. If at any point in your animation it is not needed, you can untick the box at the particular spot in the animation.

Thursday, October 13, 2011

Get Your Self A Piece of the Action

I guess having said I wasn't going to reinvent the wheel, I do seem to be chipping it out of stone bit by bit..

Today we will have our little mannequin friend do some calisthenics. Who likes Jumping Jacks? Raise your hand! Yeah, me neither but our victim doesn't get a choice.

Open up your Basic Stand that we made before. Click on frame two and copy the pose. Now create a new file. The reason I prefer to do it that way is to ensure there is no extra data further down in the file I may not notice right away and then discover after I worked my pose. Unfortunately, QA doesn't support deleting particular frames although you can end your animation earlier and thus delete something from the end.

OK, paste your Basic Stand on frame two and save it as Jumping Jack.

In the first frame our friend starts in the Basic arms down.


Let's move the arms into the up position of our Jumping Jack. First we need to establish how many frames.  A good starting point - we can always add or subtract at the end - is say 100.

In the Frame window at the lower right hand, change the number to 100 where it says 2 of ___. Make sure you change Loop Out to 100 also.

This is a fast playing animation, it's exercise!!So move your cursor over to Frame 10 for the first movement. Holding down the Alt and left Mouse lets turn the camera a bit by moving the mouse left and right so we get a good angle - if you move in and out you can get closer or further away.

OK, everyone, get up from the computer and let's really do a jumping jack or two or twenty to get a feel of what our bodies do. See how when you get ready to jump you squat down a teensy bit? Is to wind up your muscles so the power of your thighs and feet pressing against the ground propel you upwards. Note the slight rotation of your shins and thighs as well. Yes, of course you know that but it's stuff we take for granted and in order for our animations to look realistic we need to add these subtleties. So with that in mind...

First changes we are going to make.

On Frame 10 - In the Rotation box click on a body part or select from the drop down box on the right hand side of your screen. set as follows:

Thighs -   X: 11     Y: 0      Z: 0

Shins: X: 28    Y: 0   X: 0

On the Position box:  change the Y to 36.

Note how our mannequin is now slightly under the floor. This is the lowering movement from where the jump takes place.

Move to Frame 20


Shoulders: (Left)     X: -96   Y: 17      Z: -97
                  (Right)    X: -96   Y:  -17   Z:  97

Thighs: (Left)    X: 1     Y: 0      Z: -26
             (Right)  X: 1     Y: 0      Z:  26

On the Position box:  change the Y to 49.

Last Frame - 30 - Copy Frame 2.

There! All set! Hit the play button and sit back while our friend gets in shape!

Save your animation, Export to SecondLife to get the .bvh file. Fire up your world and let's Upload!!!

Upload, Animation choose your Jumping Jacks .bvh File.  Make sure you check the Loop box, the Priority (I chose 4) and click! You are done. You can of course check how the animation plays in the Preview window and make sure you didn't skip any steps. Very important if uploading to SecondLife! Those $10 Lindens can start to add up. You can also try your animation in the beta grid where uploads won't cost you or on an Open Sim grid such as www.InWorldz.com where uploads are always free.

Next time:  What is Ease In and Ease Out?

Saturday, October 1, 2011

A Little Primer

So- as I said there are countless tuts out there so I am not going to reinvent the wheel- but in case you wandered on in here and would prefer a good starting point....

Let's start with opening QA -

There is your little mannequin all set and ready to go - no pics at this point since you can see it for yourself and I am a tad lazy!

You will note the arms are straight out in the now infamous T-Pose. That first frame is needed by SecondLife and other virtual worlds as a place marker. From that frame comparisons are made to the following changes we shall make to the figure.

Firstly, I want to give u a wee bit of advice. Create a basic starting point to save you the effort later.

On your little mannequin friend move every single body part one degree in any direction that you like. Click on a body part, choose a coordinate (x, y, z) from the sliders to the right of the stage and change one to "1". This prevents the built in anims from over-ridding your careful work and messing up your anim. This will be the first thing you open from now on when creating an animation. Locking your joints makes you work go how YOU planned it to go. Save this with a sensible name such as Basic.


YOUR FIRST POSE!!

Let's try something simple - on frame two, lower the arms to the side by clicking on the left shoulder. Now see the sliders to the right? Use the Z coordinate, the blue one, and move the slider left and right watching the direction of the arm as it moves.

Oh! Notice the Menu Bar across the top. See where it says Options? thee are several choices- feel free to play with them and see what they do, but for now I want you click Joint Limits so the check is OFF. Now go back to the slider and move it all over. See what bone breaking things the poor mannequin is subjected to?

This will be important later. For now, let's not get too fancy. Click it back on and lets make a little pose.

So - I have our victim's left shoulder at minus 50 on the Z axis- that sets the left arm pretty much down. Let's do the same with the right shoulder on the z axis. Note on the right side, the setting is POSITIVE - not MINUS 50 but just 50. The Y and Z axis mirror each other, the X is the same.

I am now going to shift the right shoulder to X 30 and Y -17
(OK I give in- pictures)


Here we also have the right fore arm at Y 68, the right hand is still at X 1 from my basic pose and Z is set to 2. Let's make the legs less wooden.

Still on Frame 2, click on the Rright Thigh and move it to Z minus 5. Click on Right Shin to X 14, Right Foot is moved to X 19.

I moved the Left Thigh to X 2, Y minus 6. the Left shin is left at X 1 and the Left Foot as well.

Now - copy that frame by clicking Edit Copy from the Menu bar and then click on the last frame and Edit Paste.

You are all done!! You now have completed your first pose - a casual stand.

Let's save it - it could be a jumping off point for later on. File Save As (I recommend having a directory or sud folder or what ever other differentiation to identify your animations or type of animations but that is your choice. Name your anim and enter. The file is automatically saved as a .avm file. Now you need to Export For SecondLife. That creates your .bvh file and the file you will need to import.

Let's import the file. Now frankly, while SecondLife is the best known of the virtual worlds at the moment, there are several out there and I myself make my home on InWorldz.

the advantage to going to an OS world is there are no upload fees but feel free to use the beta grid in SL if it pleases you.

How to UpLoad

In the world, click File, Upload, Animation. Here you want to make sure you click the Loop box. You want your animation to loop in on the second frame - so change the first box to 2 where it says Loop In. The priorities control what can play over what. It depends on the purpose of your pose or animation on what Priority you should choose, but for a free standing pose ball I personally prefer Priority 4 so people do not have to turn off their Animation Overriders (AO's) so that the pose works. Leave the 100 alone. That is all there is to a simple animation upload. You could test it if you wish and see it running in the upload window or just upload and test it in world.


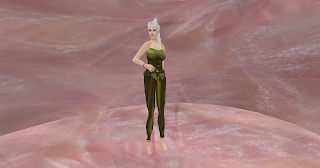
Tada!!! In world pose result. Next time - let's get a little ACTION going!!!

Friday, September 30, 2011

Blind Leading The Blind

A year ago, in August of 2010, I began my adventure with making animations for SecondLife and Open Sim virtual worlds. I downloaded this wonderful - FREE!! - program called QAvimator and was off and running. A very intuitive program, it was a pleasure getting my feet wet and in no time at all I had "something".

So, a year has passed and while I do not consider my self any kind of expert at animations, I decided I would share what information and pointers I have garnered through that year.

First off, where to download the program: QAvimator

There are screen shots there and even a small tutorial. There are a number of tuts on Youtube also and various other places on the web. I won't attempt to duplicate others' work in that aspect, but merely to add here the things I have learned and collected that sometimes seem a bit obscure.

So keep your eyes peeled for little bits of this and that to find themselves here.